


 Turn a Pine Cone into a Bird Feeder! A pine cone bird feeder is an easy, inexpensive project perfect even for young birders to make. It’s a great way to add an instant feeding station to your yard. These feeders can even be customized! Many different types of birds will eagerly visit for the treat.
Choosing the Pine Cone:
Any size or shape of pine cone can be turned into an easy feeder. However, a larger, broader cone will hold more food for the birds. In addition, it will be easier for birds to cling to, swaying less as they feed.
Ideally, the cone should be fairly open. If the cones you have available are closed, you can place them in a warm oven (150-200 degrees Fahrenheit) for several minutes to allow them to dry out a bit and open more fully. But, be sure to watch them carefully! You don’t want them to scorch. If you do warm the cones, allow them to cool completely before turning them into bird feeders.
Pine cones can be collected below pine trees in the fall. Cones that have fallen naturally are the best choice, because they will be more open and familiar to birds. Do not use scented pine cones or any decorative cones that have been painted or glittered, as those chemicals can be harmful to birds.
What You’ll Need:
In addition to the pine cone, you will need several other everyday materials:
String or twine: A piece that is 8 to 10 inches long is best, but it can be longer if necessary for hanging. Yarn or ribbon is another good option and can add a burst of color to the feeding area:
WARNING!
Avoid fishing line, dental floss, or other very thin threads that can create dangerous tangle hazards for birds. Try to use the most visible string possible, preferably string that is colorful and thick.
Peanut butter: Any brand or type of peanut butter can be used, either crunchy or smooth, and it can be past its best by date without any trouble. If peanut butter is not available, suet, lard, or vegetable shortening is also suitable. You can also use other nut butters, such as almond or hazelnut, but avoid sugar-free varieties that don’t offer birds good energy.
Birdseed: A mixed birdseed is perfect for these feeders, or straight black oil sunflower seed is also a great option. Choose the seed that will best appeal to your specific backyard birds. Pieces of nuts or small bits of fruit can also be used and will help attract more species of birds to the feeder.
Only basic tools are needed to make this feeder: a butter knife or spreader and a shallow dish or pie plate.
Materials to make a diy pine cone bird feeder:
With only a few simple steps, you can turn a basic pine cone into a delicious bird feeder:
- Remove Dirt and Debris
Shake, tap, or brush the pine cone lightly to remove any dirt or debris. Trim off any loose scales that may break as the feeder is assembled. If the scales are tightly packed, removing a few will make more room for food. - Tie the String Around the Feeder
Tie the string or twine around the feeder. Place it two to three rows of scales below the wider end of the cone with the scales overlapping the string to hold it securely in place. The top of the string can be left open in order to tie it to a branch for hanging. If it is long enough, the loop can be tied first. - Coat the Cone With Peanut Butter
– Use the knife or spreader to coat the cone with a layer of peanut butter, as thick or thin as desired. _Press some peanut butter between rows of scales, filling in larger gaps. If the peanut butter is too thick to spread well, it can be warmed up slightly to make it softer, but be sure to use a microwave-safe container to heat it.
-Avoid overheating, which might make the peanut butter too runny to adhere to the cone.Next:
- Roll the Cone in Birdseed
– Once the cone is completely coated with peanut butter, roll it in the birdseed in the shallow dish, pressing lightly to keep the seed adhered to the cone. Work the seed in between the rows of scales. Add larger seeds, nut pieces, or fruit pieces if desired, pressing them firmly into the peanut butter so that they are secure. The birds will have no trouble removing them!
– Adding the seed is an optional step and isn’t necessary to make a tasty, attractive bird feeder. Many birds will happily eat peanut butter by itself, even without added seed. You can also use softened suet to spread on the pine cone for a treat, with no extra seed required.
– Want to make multiple pine cone bird feeders at once but don’t want to hang them out simultaneously? They can easily be frozen for several weeks. The feeders do not need to be thawed before hanging. Freezing them first can help them stay firm in warmer temperatures. - Hang the Feeder
– This is a simple feeder that can be hung almost anywhere. It will do best in a cool, shaded area or else it may grow soft or melt. In high temperatures and humid areas, the peanut butter can start to go rancid and will be less attractive to birds.
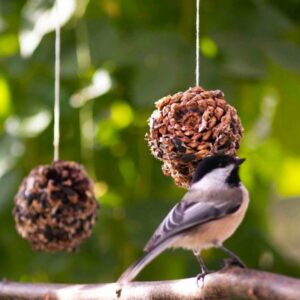
– Hang the pine cone bird feeder from a branch or hook, in trees or bushes for birds to find it easily or even string several together for a longer feeder to feed more birds. Because of its high-fat content, this is a perfect feeder to offer winter birds, and it is great for decorating Christmas trees for birds with natural, edible ornaments.
Before you know it, your new feeder will be a hotspot for chickadees, titmice, nuthatches, crossbills, woodpeckers, and other birds. Because it is so easy to make, as soon as the birds have eaten all the treats off one cone, hang another for their hungry appetites!
Visit us and let us know how this fun DIY Turn a Pine Cone into a Bird Feeder project went for you!
Article sourced from The Spruce